A well-cut diamond has a brilliance that instantly draws the eye. When the proportions are just right, it reflects light with a sparkle that feels almost magical.
But cut alone doesn’t tell the whole story. Internal clarity is just as important when it comes to how a diamond looks and sparkles. To see how clarity can make or break a diamond’s appearance, here’s a real-world example. Both of the diamonds below are graded SI2, but their visual performance is completely different.
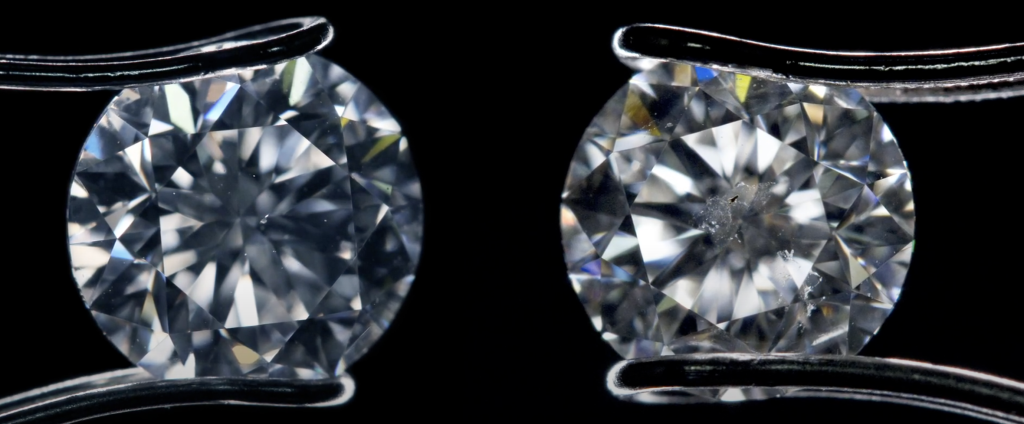
The diamond on the left is a great example of an eye-clean SI2, its inclusions are small and tucked away from view. The diamond on the right, however, has a dark crystal inclusion sitting directly under the table. While some viewers might still find it acceptable, this type of inclusion is often visible to the naked eye and can noticeably impact a diamond’s appearance.
When there’s nothing inside the diamond blocking the light, it reflects and sparkles with full intensity. That clean, uninterrupted brilliance is what makes a diamond so eye-catching and part of why it’s such a powerful symbol of commitment.
In this article, we’ll explore the imperfections inside diamonds and learn how they shape both beauty and value. Just like people, diamonds are born with flaws. And sometimes, those little flaws are what make each one special.
By the time you finish reading, you’ll know exactly what each inclusion type means and how to identify them in a diamond grading report.
If you’re here to make a smart choice and get the most out of your budget, you’re in the right place. My goal is to help you understand diamonds better so you can find the one that’s perfect for you.
Let’s get started.
Introduction to Diamond Inclusions
Diamond inclusions are internal features that formed naturally as the crystal developed deep within the Earth. You can think of them as nature’s unique markings, telling the story of the diamond’s creation.
These inclusions come in many forms. Some are tiny and barely noticeable, while others are more obvious. They can affect how light moves through the diamond and, in some cases, even influence the stone’s durability.
When a diamond is graded for clarity, inclusions are a key factor. The grade takes into account how many there are, what type they are, their size, and where they appear in the stone. Most clarity reports include a diagram that maps out the inclusions, which helps give a clearer picture of the diamond’s overall quality.
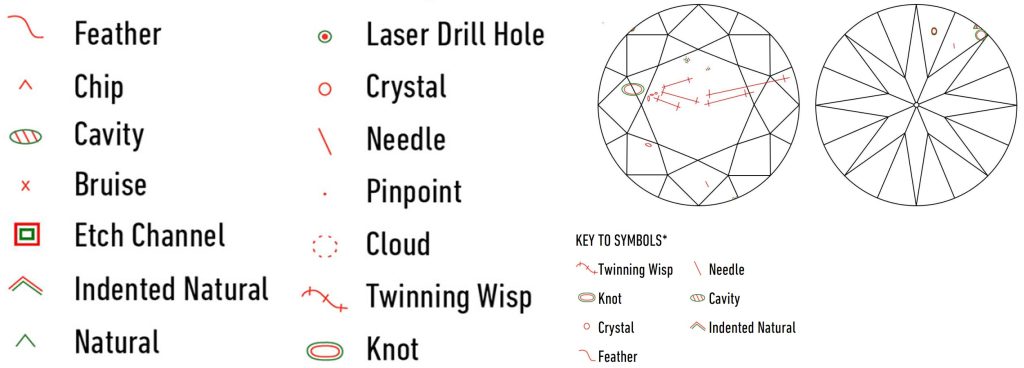
The image below shows the standard GIA symbols used to represent different diamond inclusion types, along with examples of how those inclusions are plotted inside an actual diamond clarity diagram:
Not all inclusions are bad. Some are so small they have no impact on how the diamond looks to the naked eye. Others can stand out and lower the value of the stone. Knowing how to tell the difference is a smart move for anyone who wants to get the best balance between beauty and value.
The Complete List of Diamond Inclusion Types
There are many types of inclusions, and each one can affect a diamond in its own way. Some are completely harmless and invisible to the naked eye, while others can impact both the beauty and structural integrity of the stone.
To help you get a feel for what’s out there, here’s a quick reference table covering the most common inclusion types. It highlights how often they appear, how visible they tend to be, and whether they affect durability.
| Diamond Inclusion Types – Quick Reference (Most Common) | ||||
| Inclusion Type | Occurrence | Description | Visibility Risk | Durability Concern |
|---|---|---|---|---|
| Crystal | Very Common | Small mineral or diamond crystals inside the gem | Moderate to High | Low |
| Pinpoint | Very Common | Tiny white, gray, or black dot-like inclusions | Low | Low |
| Feather | Common | Minute internal fracture, may appear transparent or white | Low to Moderate | Moderate to High |
| Cloud | Common | Cluster of pinpoints that look hazy under magnification | Moderate | Moderate |
| Needle | Moderately Common | Long, thin, white or translucent crystal | Low | Low |
| Twinning Wisp | Moderately Common | Twisted growth pattern made of clouds, feathers, and pinpoints | Moderate | Moderate |
| View the complete table with all 14 diamond inclusion types → | ||||
Let’s explore the different types of diamond inclusions, beginning with one of the most common and important to recognize: the crystal inclusion.
Crystal Inclusions
Crystal inclusions are tiny mineral deposits, and occasionally even small diamond fragments, that became trapped inside the stone as it formed deep within the Earth.
On a GIA clarity plot, a crystal is marked by a red circle. The inclusion may appear white, colorless, black, or occasionally even tinted with other colors depending on the type of mineral. White or transparent crystals tend to be less visible, while black crystals stand out more and may impact the diamond’s appearance.
Examples of diamonds with white crystal inclusions from James Allen:
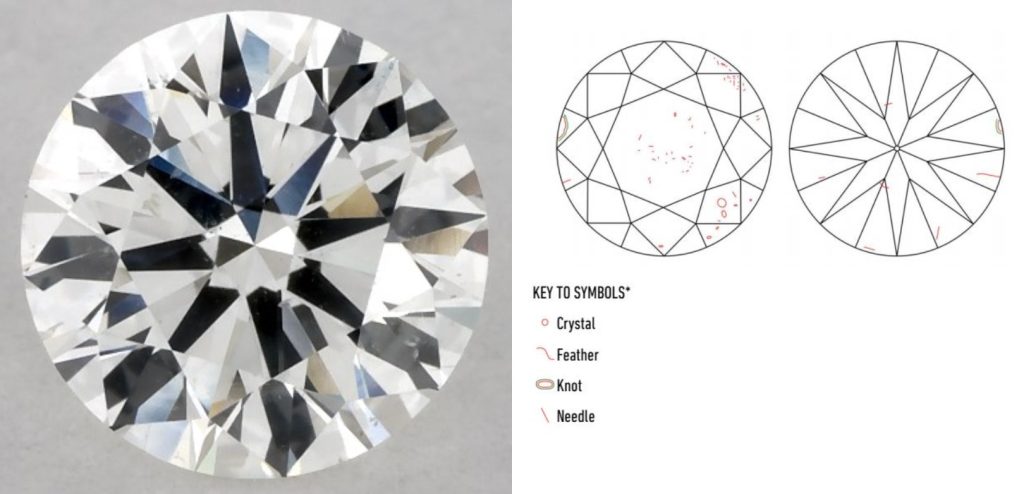
This H color SI2 diamond contains several white crystal inclusions, shown as red circles in the clarity plot. At first glance, the plot suggests that the main inclusions are located off to the side, outside the table area. However, in the actual diamond photo, a white crystal appears closer to the center. This kind of mismatch can happen because clarity plots are two-dimensional and do not account for depth or visual angle. What seems like a minor side inclusion on paper can appear more centered depending on where it reflects through the facets.
Keep in mind that a clarity plot shows the inclusion’s actual location inside the diamond, but reflections and depth can make it appear in a different spot when viewed in person. That’s why high-resolution images and videos are essential for judging eye cleanliness.
Even so, the inclusion here remains subtle. The crystal blends in with the light return of the stone and doesn’t interrupt its sparkle. This is a great example of why white crystal inclusions are often not a problem. Because they are colorless or faint, they tend to reflect light rather than absorb it, making them much harder to spot without magnification. In this case, most viewers would find the diamond eye-clean, especially once it is mounted in a ring.
This also shows why photos and videos are so important when assessing clarity. A diamond with several inclusions on paper can still look clean in person if those inclusions are small, white, and tucked away in less visible areas.
In some rare cases, you might find colored crystals inside a diamond. Garnets can appear red, while peridot crystals have a greenish hue. These are uncommon and typically avoided in diamonds meant for engagement rings or fine jewelry.
When considering crystal inclusions, your safest bet is to choose diamonds with small white crystals, especially if they are positioned under the crown facets or near the girdle. These are far less likely to be visible in real life. On the other hand, crystals that sit directly beneath the table or close to the center are easier to detect and can draw attention, depending on their size and contrast.
Black crystal inclusions are usually made of graphite or uncrystallized carbon, and they deserve special attention:
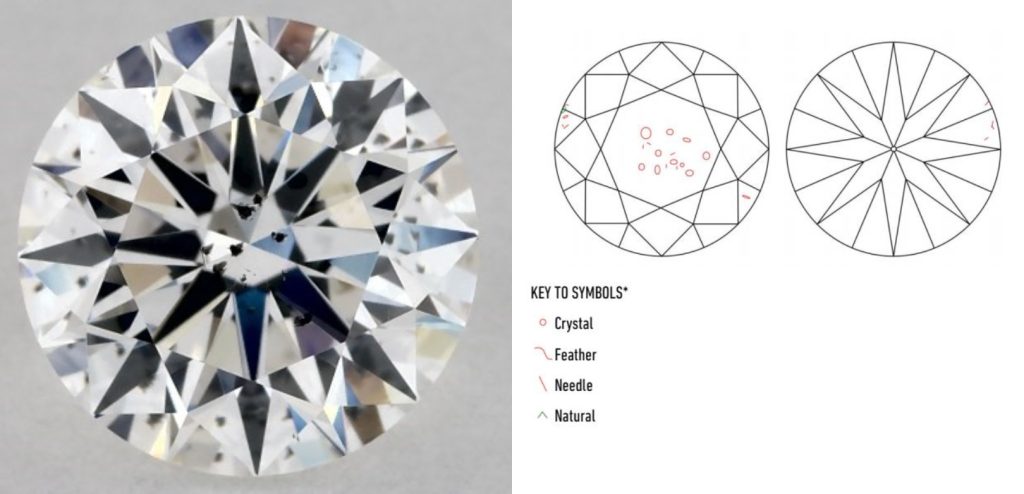
This G color SI2 diamond clearly shows multiple dark crystal inclusions clustered near the center of the table. These inclusions appear as stark black spots and are highly visible without magnification. On the clarity plot beside the photo, they are represented by red circles, indicating that they are internal inclusions. Dark crystals like these are most often composed of graphite or uncrystallized carbon, remnants from the diamond’s formation deep in the Earth.
Because of their deep color and contrast against the diamond’s brilliance, they are among the most distracting and visually severe types of inclusions. When located in high-visibility areas such as under the table, they can significantly impact both appearance and value, even in diamonds with grades like SI2, which are popular for offering budget-friendly options when the inclusions are well hidden.
Diamonds with VS2 clarity or higher may still have crystal inclusions, but these are often small, faint, and harmless. In these cases, the inclusions are usually invisible to the naked eye and do not compromise the stone’s strength or appearance.
If a crystal inclusion blends in and doesn’t catch the eye, it may offer a great value opportunity. But if it draws attention, especially when dark and centrally located, it’s worth looking elsewhere.
Pinpoint Inclusions
Pinpoint inclusions are the most common clarity feature found in diamonds. These are tiny internal spots, usually white, that look like specks of light under magnification. They typically become visible around 10x to 20x, though some finer details might only show up under 40x magnification or higher.
Pinpoints by themselves are almost always harmless. They are one of the least noticeable inclusion types and are commonly found even in diamonds with very high clarity grades like VS1 and VS2.
Example of a plotted pinpoint inclusion in a VS1 diamond (completely invisible in real life):
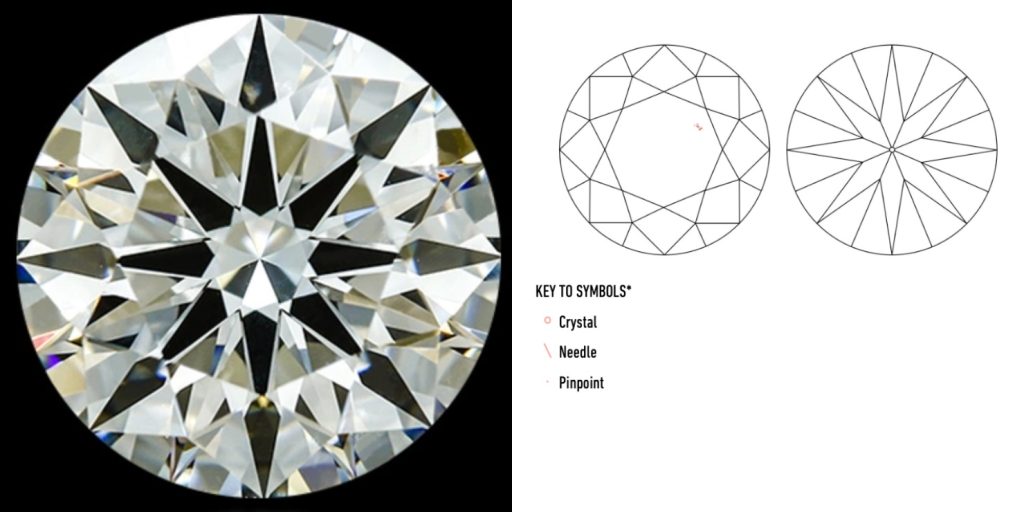
This 0.92 carat G color VS1 diamond from Whiteflash features a pinpoint inclusion that’s completely invisible to the naked eye. Even under magnification, it blends so seamlessly into the facets that it has no impact on beauty or performance.
Pinpoints can also appear gray or black depending on their composition. A single pinpoint is rarely significant enough to affect clarity on its own, which is why it is often not plotted on the diamond’s clarity diagram. Instead, you’ll commonly see a note in the grading report that says something like “pinpoints not shown.”
When several pinpoints cluster close together, they can form a cloud. This group of inclusions can create a hazy area that may begin to affect transparency and sparkle, depending on how dense the cloud is and where it’s located in the diamond.
Feather Inclusions
Feather inclusions are one of the most commonly misunderstood clarity features in diamonds. Despite the name, there is no actual feather trapped inside. The term comes from their wispy, delicate appearance, which can resemble a bird’s feather under magnification. Technically speaking, a feather is a small internal fracture in the diamond’s crystal structure.
Feathers vary in appearance depending on the diamond. Some are white and faint, others may be slightly reflective or dark. Most are harmless, especially when small and tucked along the edges or beneath the crown facets.
Example of a barely visible feather inclusion in a G-SI1 diamond:
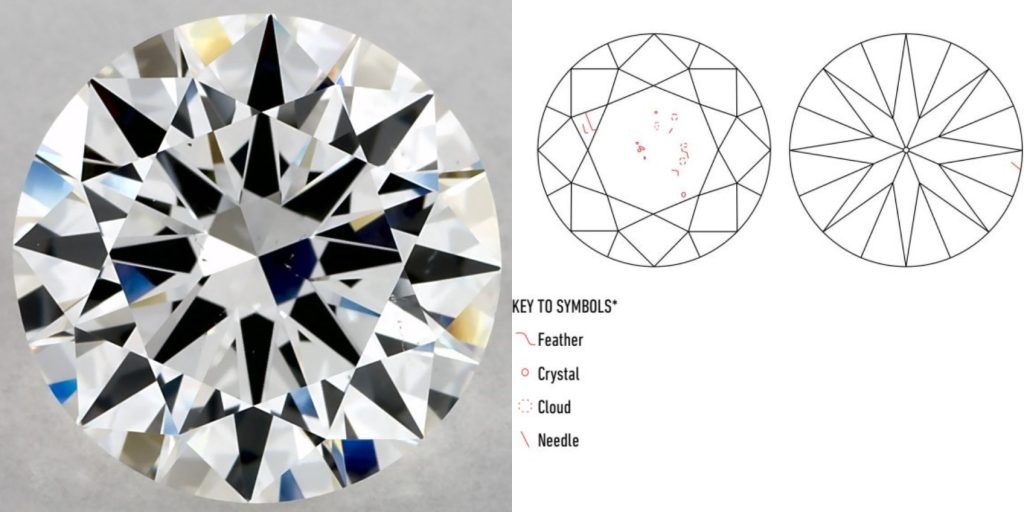
This 3.50 carat G color SI1 diamond shows a feather inclusion that is so faint it’s nearly invisible without magnification. Even in a diamond of this size, the inclusion is off-center under the crown facets and doesn’t catch light or interrupt the brilliance.
Many of my readers worry about feathers like this, but in reality, inclusions of this type are extremely common and rarely pose any concern. Even in a 3.50 carat diamond, a well-placed feather like this blends seamlessly into the stone and doesn’t affect appearance or durability. It’s also a good reminder not to overlook SI1 diamonds at higher carat weights when the clarity characteristics are favorable, they can offer excellent value without sacrificing visual beauty.
Example of a slightly reflective feather inclusion under magnification:
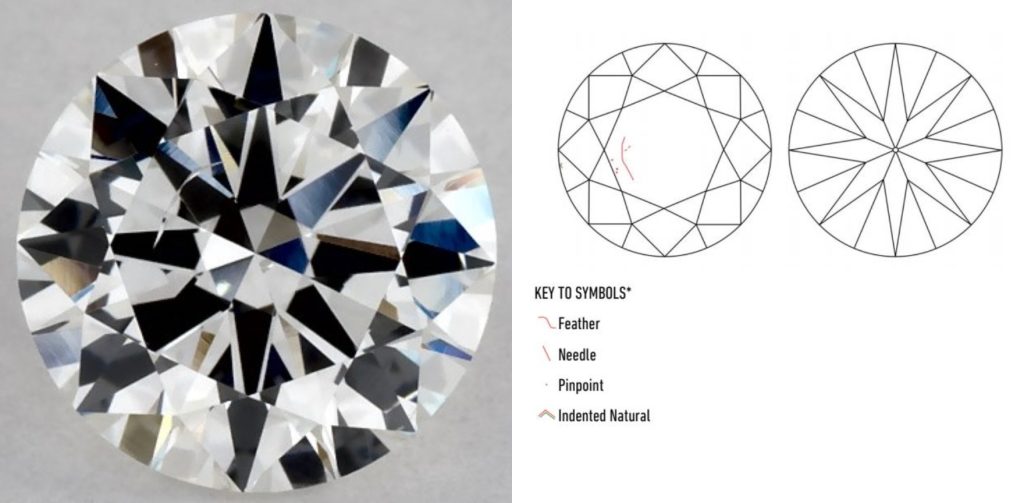
This 1.01 carat H color SI2 diamond features a feather inclusion that is slightly reflective and visible under magnification. The inclusion appears as a thin, wispy line just off-center beneath the table, catching light at certain angles. While it does not appear dark or deeply structural, the feather reaches the surface and shows a gentle curve, which can increase its visibility depending on the lighting and viewing position. This is a good example of a feather that’s not noticeable in casual viewing but becomes visible under magnification. Many shoppers would find it acceptable, especially when prioritizing cut or carat over perfect clarity.
On the other hand, feathers that reach the surface, especially near the girdle or pavilion, can weaken the structure of the diamond over time. If they’re large, sharply angled, or placed in high-stress areas, they can raise durability concerns. This is particularly worth considering if the diamond might be exposed to occasional knocks or pressure from a tight setting.
Example of a surface-reaching feather near a pointed edge:
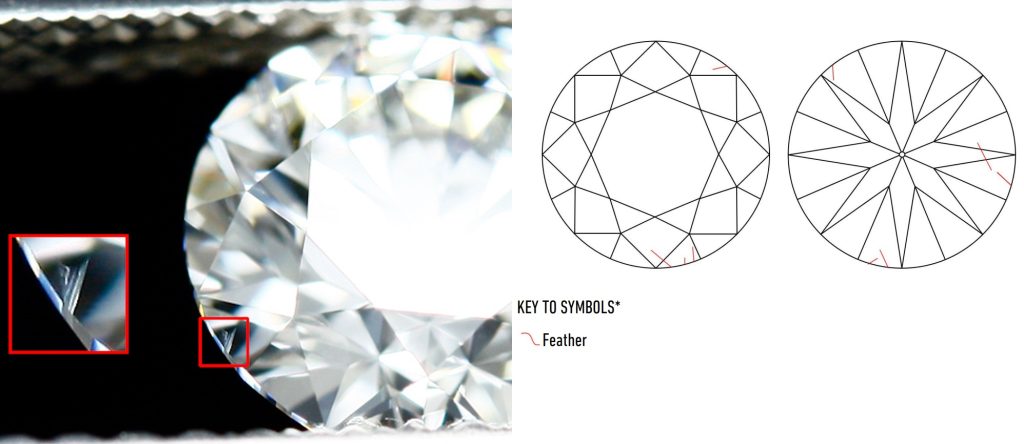
This 1.32 carat G color VS2 diamond shows a feather that reaches the surface near the edge of a pavilion facet. While the clarity grade remains high, the inclusion breaks the surface in a structurally sensitive spot. Feathers in this area can act as weak points if the diamond is hit or set with excessive pressure. Although many feathers are harmless, when they appear at points or girdle junctions, it is worth evaluating the diamond closely through video and consulting the clarity plot to confirm placement and severity.
Example of a feather inclusion reaching the girdle surface:
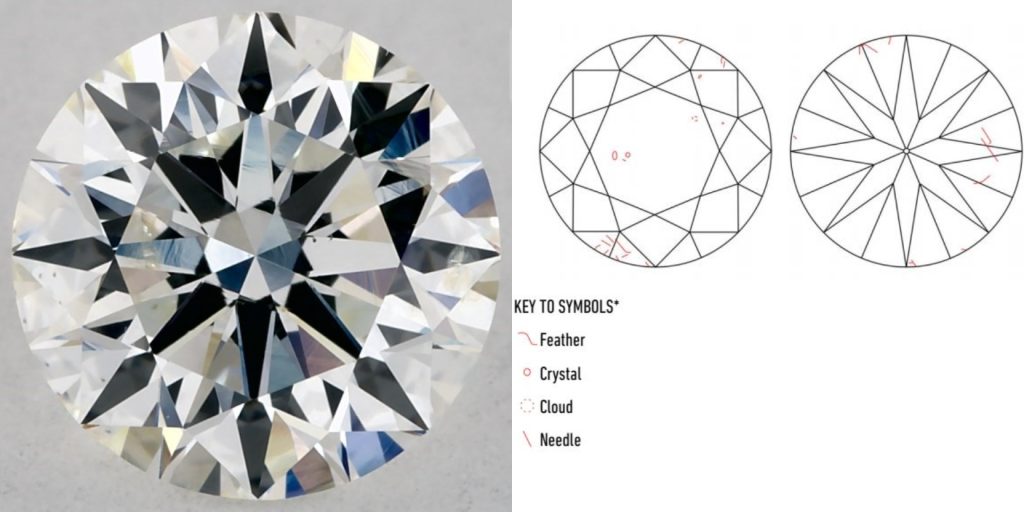
This 1.00 carat H color SI2 diamond above features a feather that spans from the crown side down into the pavilion, appearing to cross the girdle. Based on the clarity plot, the feather begins near the 7 o’clock position in the crown view and continues to about the 11 o’clock position in the pavilion view. This indicates that the feather runs diagonally through the midsection of the diamond, breaking the surface at both the upper and lower halves. While the inclusion itself is not strongly visible in the face-up view, the diagram clearly marks its presence and extent. That’s exactly why clarity plots are so important: they alert you to surface-reaching inclusions you might otherwise miss. In cases like this, feathers that break the surface in more than one area may slightly weaken the diamond’s structure, especially if the stone is exposed to sharp impacts or high-pressure settings.
This doesn’t automatically disqualify the diamond, but it’s something to be aware of, especially for active wearers or if the diamond will be set in a tension setting or thin band with tight prongs. For a feather to raise serious durability concerns, it typically also needs to be clearly visible, something that is not the case here if you view the diamond from all sides.
How to identify surface-reaching feathers using a clarity plot:
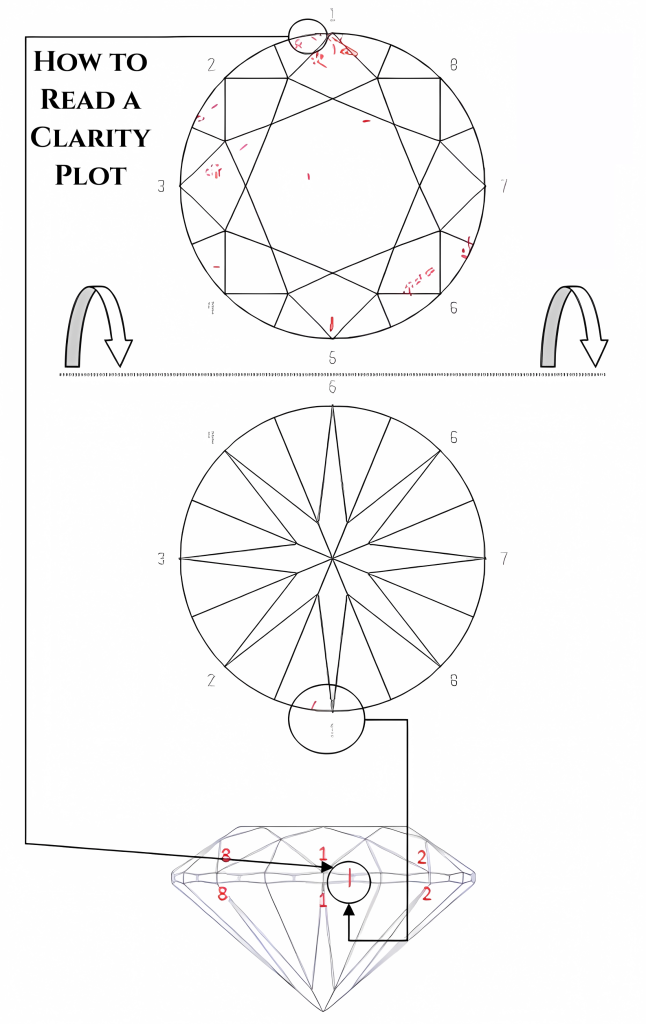
This annotated diagram shows how a feather can be mapped across both the crown and pavilion views of a GIA clarity plot. The top circle represents the table view, while the bottom one shows the pavilion. The numbers help orient the viewer by indicating consistent locations. When the same feather appears on both views, as it does at the 1 o’clock position here, it’s a sign that the inclusion passes through the girdle. These are the types of inclusions that may raise minor durability flags, depending on their size, angle, and depth.
Feather inclusions are not a dealbreaker by default. In fact, they are among the most common clarity features, even in diamonds graded VS2 or higher. The key is to consider their size, placement and visibility. Small, white feathers placed away from stress points are typically safe and easy to live with.
Want to go deeper? I wrote a full guide that covers when feather inclusions are harmless and when they’re a red flag, with even more real-world examples.
Cloud Inclusion
You may have noticed that most inclusion names are short and easy to remember. The “cloud” is no exception. It gets its name from its soft, hazy appearance but in reality, a cloud is just a tight cluster of pinpoint inclusions grouped so closely together that they can blur the light as it passes through the diamond.
Clouds are typically marked on a clarity plot as a fuzzy cluster of tiny red dots. However, many grading reports don’t even plot them if they’re insignificant. Instead, you’ll often see a comment like “additional clouds not shown.”
When clouds are small and located off to the side, they are harmless and don’t impact the diamond’s beauty. But in some lower clarity grades, especially SI2 or I1, large clouds can start to affect transparency and brilliance. This is when the diamond might appear a little dull or “milky” in certain lighting.
The key is to look beyond the grading plot. Use videos or high-resolution images to see if the cloud softens the sparkle or darkens the center. If the diamond still looks crisp and bright in real life, then the cloud is unlikely to be a concern.
Example of a hazy cloud inclusion dulling the center of the diamond:
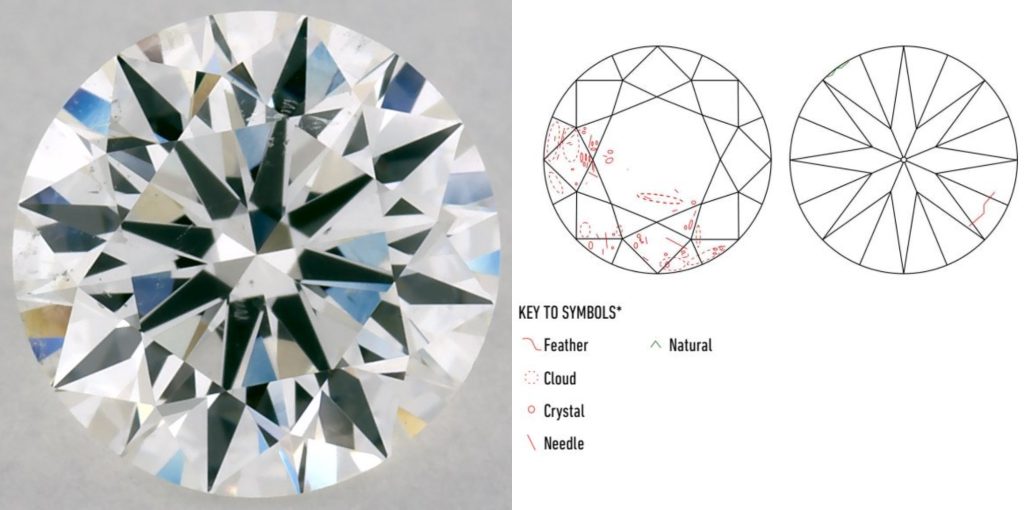
At first glance, the diamond above might seem full of promise, but a closer look reveals a subtle fog right beneath the table. The 1.00 carat G color SI2 diamond has a large, centralized cloud inclusion that mutes light return through the core. The result? A softer, slightly blurred look that gently dampens brilliance without a clearly defined “spot.”
Even without magnification, the center of the stone may appear less lively or slightly out of focus. If a diamond’s sparkle seems subdued or the reflections look hazy, especially in the middle, there is a good chance that a sizable cloud is affecting the light. This is one reason why real imagery is so valuable when judging clarity instead of relying only on the plot.
Example of a dark-appearing cloud inclusion in an SI2 diamond:
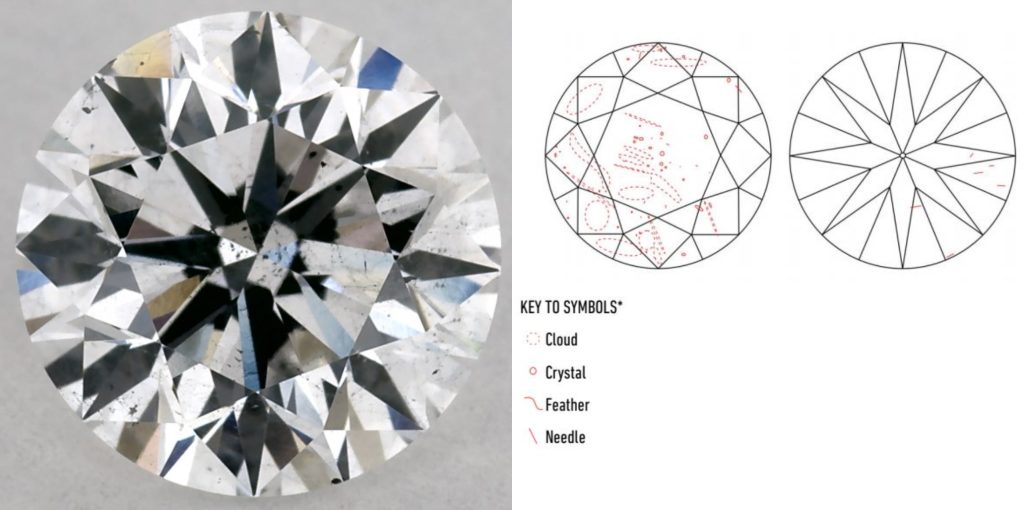
This 1.01 carat F color SI2 diamond is an unusual case. Instead of the typical milky haze, the cloud inclusion shows up as a noticeably dark patch under the table. Why does that happen? The pinpoints are tightly packed in a small area, creating a concentrated zone that blocks more light. Although it is still classified as a cloud, its visual effect feels closer to a dark crystal, especially under bright lighting.
These dense, shadow-casting clouds are rare but they do occur in lower clarity diamonds. This is a perfect example of why a GIA plot does not tell the full story. Two diamonds might both be labeled as having clouds, but only a real image will show which one affects brilliance and which one quietly fades into the background.than relying solely on the clarity plot.
If you’re considering buying a cloudy diamond, see my complete cloud inclusion guide to learn how they form in both natural and lab-grown diamonds and how to spot the risky ones.
Needle Inclusion
Needle inclusions are long, thin crystals that formed under intense pressure during the diamond’s growth. While they belong to the same family as crystals, clouds, and pinpoints, needles have a more elongated, linear shape. In most cases, they are white or translucent, and they often run parallel to the crystal structure of the diamond.
When viewed under magnification, a needle may look like a faint hairline or a streak of light inside the stone. Because of their thin shape and lack of contrast, single needle inclusions are rarely visible to the naked eye. Most of the time, they go completely unnoticed, especially in diamonds with higher clarity grades.
Problems can arise when multiple needles appear close together. If they are tightly clustered or positioned under the table, they may begin to catch light and show up as a faint haze or streak. That is when a group of needles might affect a diamond’s overall brilliance or transparency.
Needles are often plotted as thin red lines on a clarity diagram, similar to feathers. But just like with other inclusions, the impact depends on their size, placement, and visibility in real life. One or two faint needles in the corner of a diamond won’t matter much, but a concentrated bundle near the center is worth a closer look.
Example of a visible needle inclusion near the table:
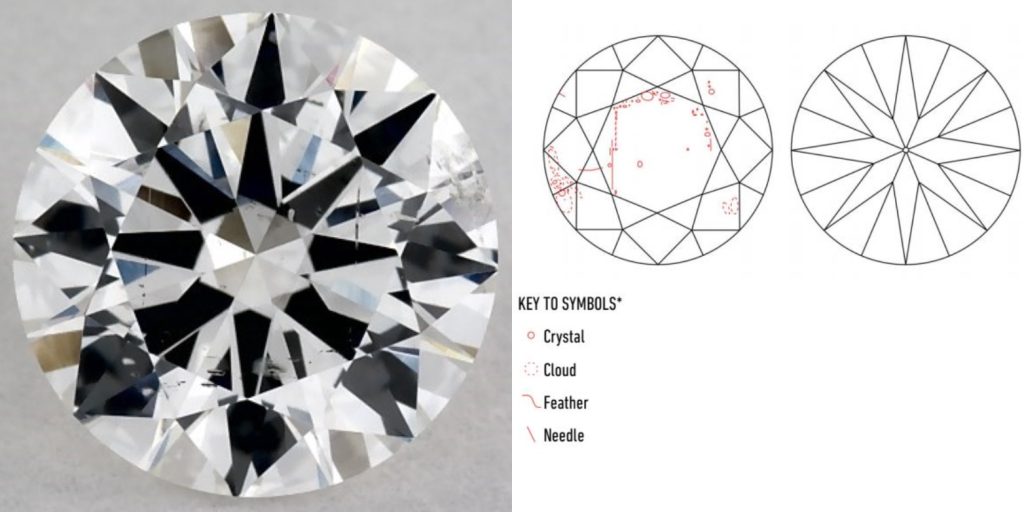
Here’s a rare example where a needle inclusion actually shows up to the naked eye. This 1.02 carat G color SI2 diamond has a long, slender inclusion sitting just left of the table. Look closely, and you’ll spot a thin vertical streak, it’s white enough and well-positioned enough to catch the light.
Most needle inclusions are tucked away or too faint to notice in real life. But in this example, its position and contrast make it more obvious. It’s still harmless in terms of durability, but it goes to show how certain inclusions can pop depending on how they interact with the stone’s cut and lighting.
That said, this diamond won’t be eye-clean to everyone. If you’re sensitive to small imperfections or want a flawless look, this may not be the one. But for shoppers who don’t mind a subtle inclusion in exchange for better size or cut at a lower price, it could still be worth considering.
Twinning Wisps
Think of stretch marks but inside a diamond. These wispy, streak-like inclusions are caused by irregularities in the diamond’s crystal growth. They form when the crystal’s structure pauses and then resumes growing in a slightly different direction, creating visible twisting or folding lines within the gem.
Did You Know?
Twinning wisps in natural diamonds form when the gem’s growth is interrupted and then resumes, sometimes thousands of years later. Interestingly, lab-grown diamonds go through similar stops and restarts. In CVD-grown diamonds, slight changes in temperature or pressure can leave behind striations or hazy zones that resemble twinning wisps under magnification. So whether grown by Earth or by lab, a diamond’s internal structure can reveal a surprising amount about how it formed.
What makes a twinning wisp unique is that it’s not a single type of inclusion. It’s actually a mix of several inclusion types all packed into one. Inside a twinning wisp, you’ll often find clouds, pinpoints, feathers, and crystals all tangled together in a narrow band. These can appear white or translucent, and sometimes they create a slightly hazy streak when viewed under magnification.
Twinning wisps are commonly seen in fancy shape diamonds, such as pears, ovals, and marquise cuts. That’s because these shapes are often cut from twinned diamond crystals that experienced growth interruptions during their formation deep in the Earth.
Whether a twinning wisp matters depends on how visible it is. In many cases, it’s so thin and well-positioned that you won’t notice it with the naked eye. But if the wisp is located directly under the table or stretches across a large part of the stone, it could affect brilliance or clarity grade.
The key is to treat twinning wisps like any other inclusion. Look at real photos and videos and judge how it affects the diamond’s appearance. Some wisps are completely harmless and invisible without magnification, while others may cause a slight haze depending on their density and placement.
Let’s look at two real-world examples to see how twinning wisps can range from faint to highly visible.
Example of a diamond with moderately visible twinning wisps under magnification:
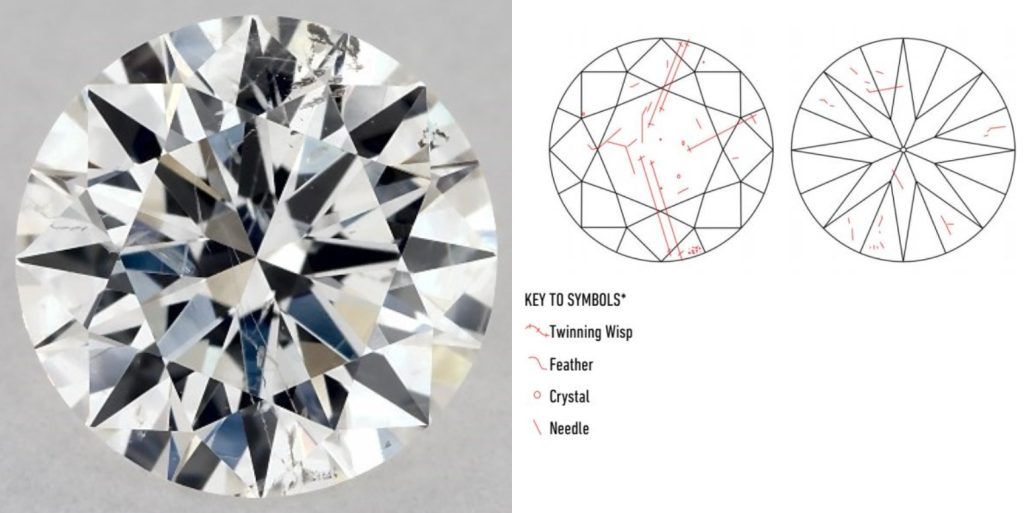
Twinning wisps can sometimes blend into a diamond’s sparkle, but in this case, they stand out as thread-like streaks crossing the upper right and lower left portions of the table. This 1.04 carat F color SI2 diamond shows a textbook example of how twinning wisps can appear when they’re more densely concentrated.
While the diamond is still full of light and sparkle, these inclusions are visible under magnification and may be faintly noticeable in certain lighting with the naked eye, especially when viewed closely and at an angle. For most casual observers, this diamond might still appear eye-clean in regular conditions, but under close inspection or bright lighting, the wisps could become faintly noticeable. This makes it a great learning case: a diamond that shows the visual impact of wisps without being overly distracting or dull.
Example of a diamond with clearly visible twinning wisps without magnification:
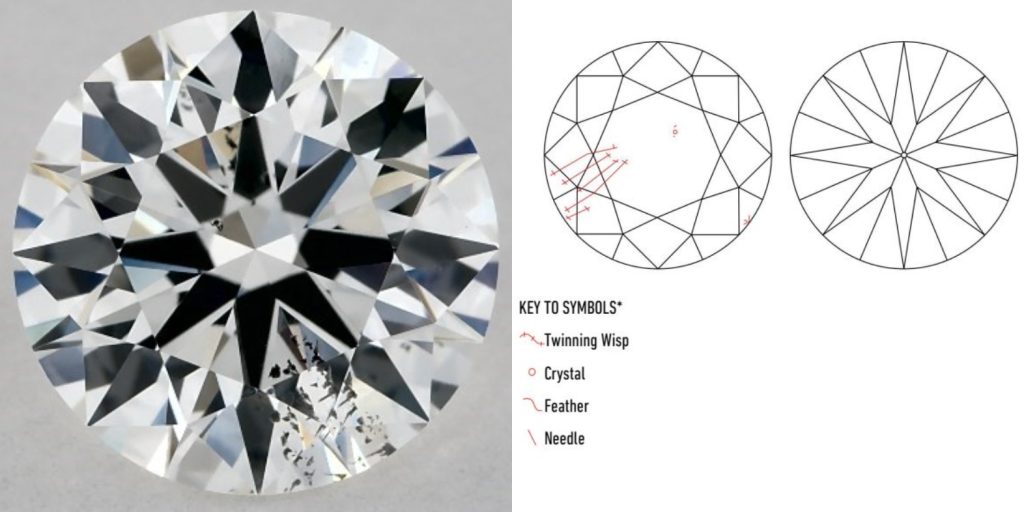
This 1.00 carat F color SI2 diamond shows just how impactful a dense twinning wisp can be when it forms near the surface and spreads across a large section of the table. The inclusion pattern at the bottom right isn’t subtle, it appears as a patchy, smoky blur with black and white interruptions. While it might not look like a traditional “crack” or “dot,” the effect is unmistakable once the stone is viewed face-up.
Twinning wisps like this break the illusion of clarity by scattering light unevenly, softening contrast, and drawing the eye to a distracting area. It’s a good example of an inclusion that may not look severe in a plot diagram but ends up being very noticeable in real life. For shoppers prioritizing eye-cleanliness and sparkle, this one would likely be a pass.
Natural Inclusion
Not all inclusions are flaws in the traditional sense. A natural is a perfect example. This inclusion isn’t damage or a crack, it’s actually a small piece of the diamond’s original outer surface that was intentionally left untouched during cutting. You’ll usually find it along the girdle edge, where it has the least visual or structural impact.

The name fits well because this inclusion is, quite literally, natural. It’s part of the diamond’s “skin” from the rough crystal, preserved to maintain weight and maximize the final size. In many cases, naturals serve as helpful guidelines for cutters, showing just how efficiently they shaped the stone without wasting good material.
In fact, about 20 years ago, it was common practice for cutters to leave tiny naturals on the four corners of round diamonds as a kind of proof, a way for factory owners to confirm that the cutter hadn’t shaved off more than necessary from the rough. Today, naturals are still very common and nothing to worry about.
Unless they’re extremely large or creep into the crown or pavilion, naturals don’t affect the durability or sparkle of a diamond. Most are so thin and well-placed along the girdle that they’re invisible without magnification.
Side-by-side view of a Natural and Indented Natural inclusion:

Now let’s take a closer look at its slightly more complex sibling: the indented natural.
Indented Natural
An indented natural is exactly what it sounds like. It is a small section of the diamond’s original rough surface that dips slightly into the finished gem. It is similar to a regular natural inclusion, but instead of sitting flat against the surface, it creates a shallow indentation that becomes visible under magnification.
Example of an indented natural inclusion visible near the girdle, shown alongside its clarity plot:

This zoomed-in image captures a sharp view of an indented natural inclusion dipping just below the polished surface near the girdle edge. On the right side, the red boxes highlight the matching location in both the crown view (left plot) and pavilion view (right plot) of the GIA clarity diagram. You’re looking at the same exact spot from two angles, just like rotating the diamond slightly on its side.
In this pear-shaped diamond, the indented natural appears right along the upper-left shoulder. When a diamond is mapped in the GIA plot, the crown view shows inclusions visible from the top, while the pavilion view reveals those seen from the bottom. Since indented naturals cross into the surface at the girdle (the dividing edge), they can be recorded in both views. This visual pairing is a rare chance to see how plot symbols and real-world inclusions align.
Just like standard naturals, indented naturals are usually located around the girdle edge. They are often left in place by the cutter on purpose. Polishing them away would require removing more of the diamond’s weight, which might reduce its carat value. If the indented natural is small and well-placed, most cutters leave it untouched to preserve carat weight and avoid unnecessary polishing.
Did You Know?
Indented naturals are actually considered a sign of thoughtful cutting. Instead of polishing away extra carat weight to remove a harmless surface mark, the cutter keeps the diamond as large as possible. This can be especially helpful when trying to hit key sizes like 1.00 or 1.50 carats. As long as the indented natural does not reach a critical spot, it is often a smart tradeoff.
People unfamiliar with clarity inclusions sometimes confuse indented naturals with chips. But they are quite different. A chip forms after the diamond is cut, often from accidental impact. An indented natural, by contrast, is part of the original crystal surface left behind on purpose during cutting.
Example of a small indented natural along the girdle edge:
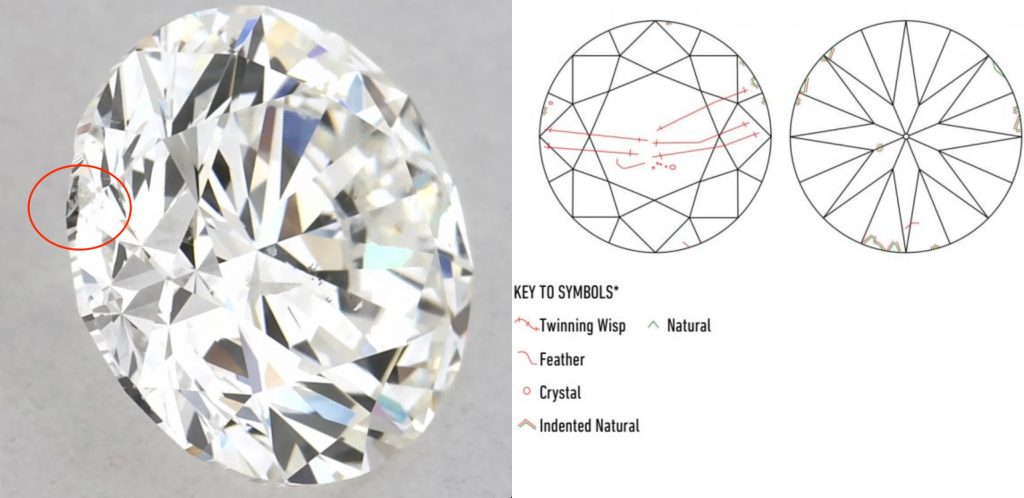
A subtle feature along the girdle edge becomes noticeable around the 5 to 6 o’clock position when viewed from the pavilion side. In the clarity plot, this inclusion is marked with a green outline, identifying it as an indented natural. It is a small part of the rough that dips just beneath the diamond’s polished surface.
If you check the diamond’s video, you will briefly see this area catch the light as the stone turns. While minor and difficult to spot in still images, it offers a great opportunity to learn how indented naturals may show up in real-world footage. This 1.00 carat G color SI2 clarity diamond is a great teaching example. The indented natural does not affect the brilliance or overall beauty of the stone. It simply reflects a choice by the cutter to preserve more of the rough while still delivering a symmetrical, well-cut gem.
In most cases, indented naturals are nothing to worry about. As long as they are not large or sitting in a fragile spot, they do not affect the beauty or durability of the stone. It is always worth checking videos or high-resolution images to make sure the indented area is small and not placed where prongs or pressure could become an issue.
Knot Inclusion
A knot is a type of crystal inclusion that breaks through the polished surface of a diamond. While most crystal inclusions are fully enclosed inside the gem, a knot is different because part of it actually reaches the exterior. Under magnification and proper lighting, you can often see where the crystal meets the surface of the diamond.
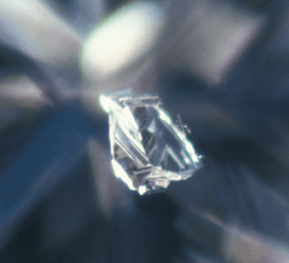
What makes knots tricky is that they can affect both beauty and durability. Visually, a knot may appear as a raised spot or irregularity along a facet edge. In some cases, it reflects light differently than the rest of the surface, making it noticeable even without magnification. If it is large or placed near the crown, a knot can prevent a diamond from being considered eye-clean.
Knots can also pose structural concerns. Since the crystal breaks through the surface, it may create a weak point that increases the risk of chipping, especially if it’s located near the girdle or a corner in a fancy shape.
Example of a diamond with a surface-reaching knot inclusion:
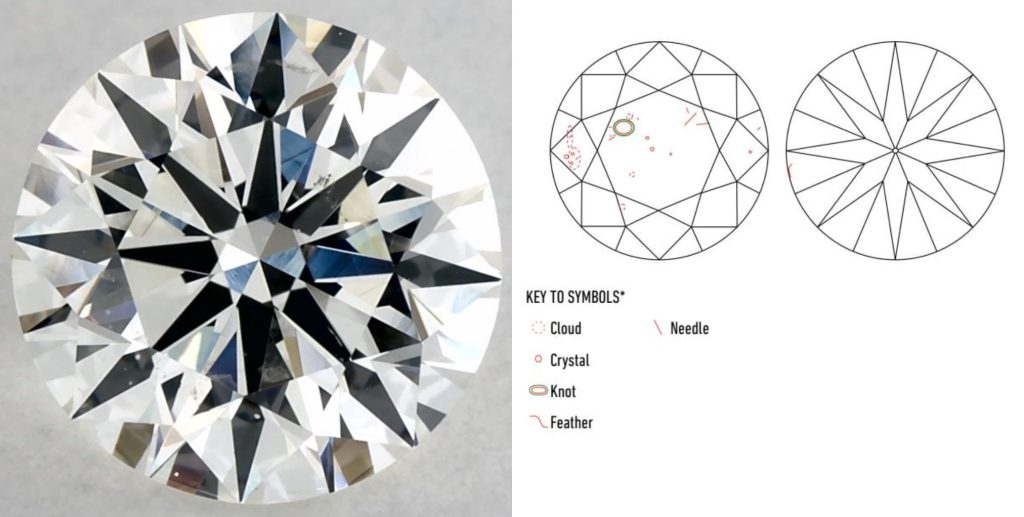
A surface imperfection can be spotted in the upper-right portion of the table, just above center. In the clarity plot, the knot is marked with a green outline on the left side (around the 9 to 10 o’clock position), but in the actual image of the diamond, the visible inclusion appears on the opposite side, closer to the 2 to 3 o’clock area. This is a common occurrence when vendors photograph diamonds at a different orientation than the GIA crown-view diagram. Unlike fully enclosed inclusions, a knot meets the outside of the diamond, creating a visible disturbance that may reflect light differently or appear raised under magnification.
This 1.51 carat H color SI1 diamond shows how knots can appear even in diamonds with decent clarity grades. While the inclusion may not be obvious from every angle, it breaks the surface and can affect both polish and durability. A close-up inspection or video review is always recommended when “knot” is listed in the grading report.
If a diamond’s grading report lists a knot, it’s best to examine the stone using videos or high-resolution photos. In some diamonds, the knot may be tiny and hidden along a facet where it is hard to detect. But if it’s visible or located in a vulnerable area, it’s often worth looking for another option.
Because knots break the surface of the diamond and are often visible without magnification, they present both visual and structural drawbacks. They are among the few inclusion types that can impact a diamond’s polish and potentially weaken its durability. For that reason, it’s best to avoid diamonds with knot inclusions altogether, especially when other options without surface-reaching flaws are available. If you spot “knot” listed in a grading report, it’s usually a sign to move on.
Chip Inclusion
It’s easy to confuse the term “chip” with the idea of a “diamond chip”, a tiny diamond used in jewelry. But in the context of clarity, a chip inclusion is something entirely different.
A chip inclusion is a small surface blemish, usually found near the girdle edge, facet junctions, or corners of the diamond. It typically occurs after the diamond has been polished and is caused by accidental impact, pressure, or rough handling and not during the natural formation of the diamond.
Chips vary in appearance. Some look like shallow flakes, while others resemble small scoops taken out of the surface. They are most noticeable when they break the clean lines between facets or disrupt light performance near the edge of the stone.
Examples of Chip Inclusions at the Girdle and Culet Areas:
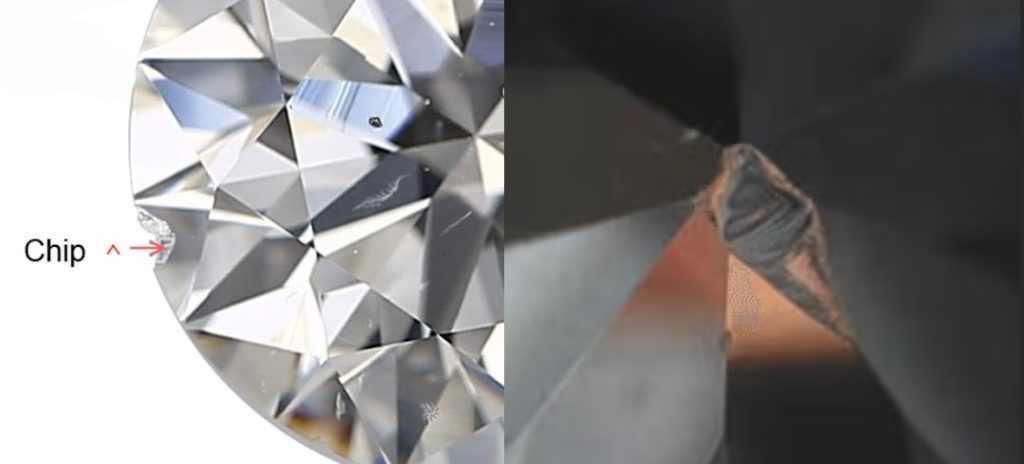
In this combined image, you can see two chip inclusions: one along the girdle and another near the culet. Both disrupt the smooth geometry of the diamond, though in different ways. The girdle chip breaks the clean line between facets and is easily visible without magnification. The culet chip is more subtle but still affects symmetry and could compromise durability if struck. Chips in these areas may seem minor, but because they occur at structural junctions, they deserve a closer look before deciding whether the diamond is a safe long-term choice.
Because chips are damage rather than natural inclusions, they can be removed by re-polishing the diamond. Minor chips often require just a light polish, but larger ones may need re-cutting. That can lead to a reduction in carat weight or a shift in symmetry, so it’s not always a simple fix.
In small sizes, chips don’t pose much risk, especially if they’re far from the table or hidden under a prong. But if the chip is near a sharp point (like the tip of a marquise or princess cut) or right on the girdle, it may weaken the structure and make the diamond more vulnerable to further damage.
Whenever you see the word “chip” in a grading report, it’s worth double-checking. If the chip is visible without magnification or affects a prominent part of the stone, it might not be worth the compromise, especially if the diamond can’t be polished without losing value.
Cavity
A cavity in a diamond is exactly what it sounds like: a small hole or deep indentation that reaches into the surface of the stone. It forms when an internal crystal or inclusion falls out during the polishing process, leaving behind an open pocket.
You might think of it like a cavity in a tooth. Just as food and bacteria can settle into those spaces, dirt and oils can collect inside a diamond cavity over time. This buildup can make the cavity appear darker and more noticeable, especially if it’s not regularly cleaned.
Most cavities are small and only visible under 10x magnification, meaning they don’t usually impact the diamond’s beauty in casual viewing. But their visibility and impact depend on size and location. Cavities can appear along the girdle, crown, pavilion, or even directly under the table.
Example of a cavity inclusion in a 1.00 carat diamond with multiple surface-reaching features:
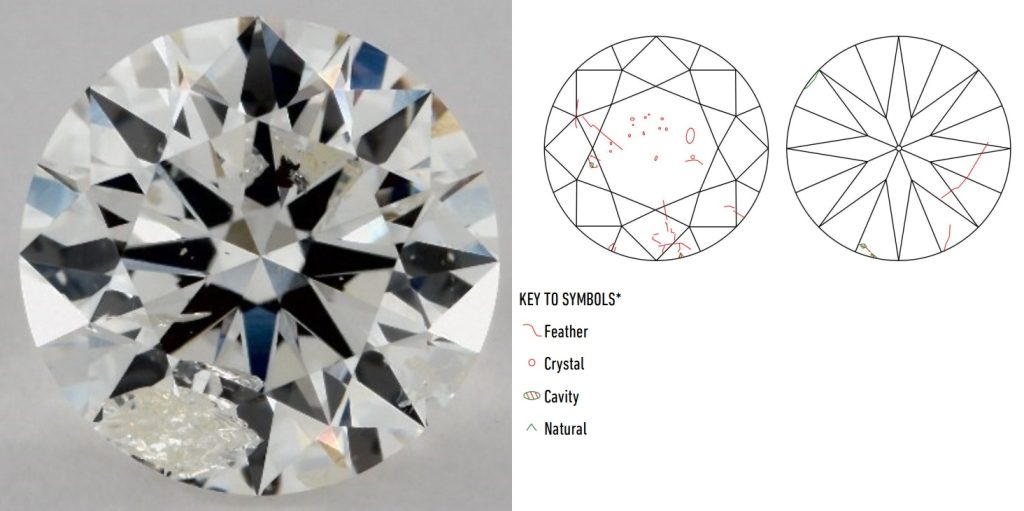
In this 1.00 carat G color I1 clarity diamond, the lower pavilion features a cluster of inclusions, most notably a feather and a cavity near the edge. While feathers dominate the clarity plot, the cavity is marked near the 5 o’clock position and is responsible for the open surface area that can trap dirt or affect brilliance. Although the inclusion is not sharply defined as a standalone cavity, it gives a real-world look at how a cavity can appear when mixed with other clarity characteristics. This example also highlights why it’s important to examine images alongside grading reports, not all inclusions are perfectly isolated in appearance.
A cavity near the crown or girdle is unlikely to affect brilliance and may even be covered by a prong in the setting. But if it’s near the pavilion or directly under the table, it can catch the light in a distracting way or reduce clarity. Larger cavities may also become weak points if placed near edges or corners, particularly in fancy-shaped diamonds.
When reading a grading report, the presence of a cavity is not an automatic red flag but it is worth investigating. Use images or videos to check whether the cavity disrupts the diamond’s appearance or if it’s tucked away where it won’t matter. And if you see one that’s clearly visible without magnification, it might be smart to look for a cleaner alternative.
Bruise Inclusion
We all know what a bruise looks like on skin. A mark left behind from impact. Well, diamonds can get bruises too. And while they are tougher than skin, they are not indestructible.
A bruise is caused by a sharp blow to the diamond’s surface. The impact creates a small area of surface disruption, but it does not stop there. It sends tiny feather-like fractures just beneath the surface, making it a true inclusion. That is what separates a bruise from a simple blemish. It breaks through the exterior and continues into the interior of the gem.
Bruises most often show up on the crown of a diamond. This is the area that takes the most handling during cutting, setting, and daily wear. They can appear as small cloudy spots. Under magnification, you may see internal lines radiating from a central point, similar to the way a bruise spreads under pressure. That said, bruises are one of the rarer inclusion types. Most buyers will never actually encounter one unless they are specifically looking through magnified diamond photos or reviewing lower clarity grades.

In many cases, bruises happen during polishing or setting. If the cutter uses too much pressure to speed up the process, or if the gem receives a sharp bump during handling, a bruise can form. It is often the result of haste or rough treatment rather than anything that occurred during the diamond’s formation.
Visually, bruises can be mistaken for blemishes. But because they reach into the diamond, they are more serious. They can affect both clarity and durability. A bruise near the edge or on a pointed corner can act as a weak spot and increase the chance of chipping.
If you see the word “bruise” on a grading report, it is a good idea to examine the diamond closely. Small bruises near the crown may not be a big issue. But if they are in a noticeable area or close to a structural point, they may not be worth the trade-off.
Laser Drill Hole
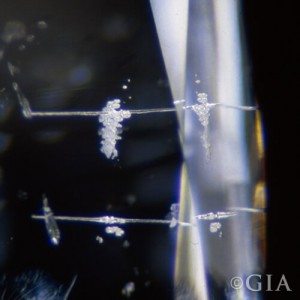
We tend to imagine lasers as something dramatic, but in diamonds, a laser drill hole is much smaller than it sounds. In fact, most are invisible to the naked eye and only show up under magnification.
The process behind it is fairly straightforward. A microscopic tunnel is created using a focused laser beam. The purpose? To reach and remove a dark or unsightly inclusion, usually a black crystal. Once the tunnel is made, a strong acid is introduced to bleach or dissolve the inclusion, improving the visual clarity of the diamond.
In a GIA clarity plot, laser drill holes are marked as a tiny red dot with a green outline. However, if the surface entry point is no longer visible perhaps due to being repolished, you will usually find a comment in the grading report that says “Internal laser drilling is present.”
Laser drill holes are relatively rare. Most diamonds are not treated in this way, especially those with clarity grades of SI1 or higher. You’re unlikely to encounter them unless you’re specifically browsing lower clarity stones or treated diamonds.
While laser drilling can enhance the appearance of a diamond, it comes with tradeoffs. Because the treatment alters the stone, it often lowers its market value and should always be disclosed. Reputable sellers will mention laser drilling up front, and it’s something buyers should be aware of, especially if they’re browsing in the SI or I clarity ranges.
Laser drill holes are not the same as natural inclusions. They are man-made features introduced after cutting, and even though they can improve clarity visually, they also serve as a reminder that the diamond has been artificially enhanced.
Etch Channel
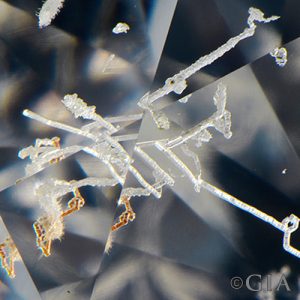
Etch channels can be easy to confuse with laser drill holes at first glance. Both appear as tiny tunnels inside the diamond, but there’s a key difference: etch channels are completely natural.
While laser drilling is done by humans, etch channels form during the diamond’s fiery journey from deep within the Earth’s mantle. As the crystal makes its way to the surface, intense heat and chemical activity sometimes leave behind worm-like hollow paths, creating what gemologists refer to as etch channels. Some appear as a single tube, while others form in groups or run parallel like tracks etched into the stone.
Because of their shape, they can trap dirt or oil, which may make cleaning more difficult over time, especially if they reach the surface. If placed on the pavilion (the bottom side of the diamond), they can interfere with light performance or become visible through the table.
The good news? Etch channels are rare, and in most diamonds they’re either microscopic or not surface-reaching. But when present and obvious, they are best avoided, especially if they appear in the pavilion or crown area where they can affect brilliance.
Rare Diamond with Prominent Etch Channels – A Collector’s Delight:
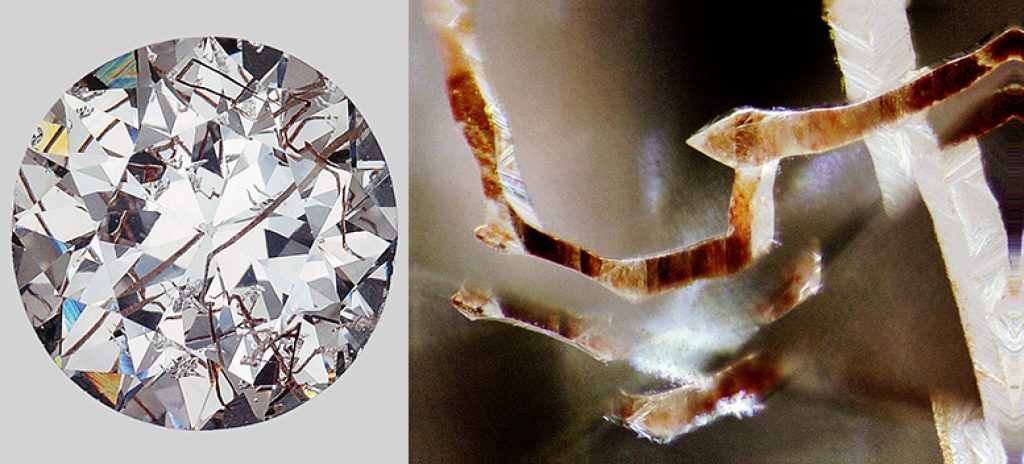
These etch channels are not just rare, they are spectacular. The twisting, hollow-like tunnels seen here formed naturally as the diamond made its ascent from deep within the Earth. Some etch channels appear as delicate lines, but in this case, they look more like branching pathways or fossilized veins. Collectors of unusual gem inclusions often seek out stones like this because of their distinct personality. While these features can affect cleanliness and durability if poorly placed, they also tell a geological story billions of years in the making.
What Type of Inclusion Should You Avoid?
Every inclusion tells part of a diamond’s story. These natural features form under intense pressure and heat, and in many cases, they add character and uniqueness to the gem. But not all inclusions are created equal. Some are harmless, while others can affect both the beauty and durability of the diamond. So, if you’re wondering which types to steer clear of, two stand out: chips and dark crystals.
Chips are surface-reaching blemishes caused by impact or mishandling. Once the diamond’s surface is compromised, it becomes more vulnerable to future damage. A chip is not just a visual flaw, it can also weaken the overall structure of the stone, especially if it’s near the girdle or a pointed edge. Even a small chip can grow worse over time if the stone is knocked again.
Then there are dark crystals, often referred to as black spots or carbon inclusions. These are highly visible under magnification and sometimes even with the naked eye. They appear as harsh black dots that disrupt the diamond’s sparkle and draw attention away from the brilliance of the cut. Unlike other inclusions that blend into the body of the stone, dark crystals stand out and not in a good way.
If you’re choosing a diamond for daily wear, like an engagement ring, avoiding chips and dark crystals will go a long way in ensuring lasting beauty and durability. Most other inclusions can be perfectly acceptable if they’re small, well-placed, and don’t disrupt light performance. But chips and black inclusions? Those are red flags worth taking seriously.
How to Read a Diamond Clarity Plot
Remember that the first inclusion on the grading plot is the grade-setting inclusion. It’s mainly responsible for the clarity grade. Also take note that internal flaws are in red color and external flaws are in green.
Most of the time, GIA and AGS only issue clarity plots for diamonds above one carat. So, don’t be surprised if a diamond under one carat doesn’t bear a clarity plot in its grading report.
Looking at a diamond clarity plot is a great way to have a more accurate information about the diamond’s inclusions. However, the grading certificate is not enough.
Just have a look at these clarity plots that I found at James Allen:
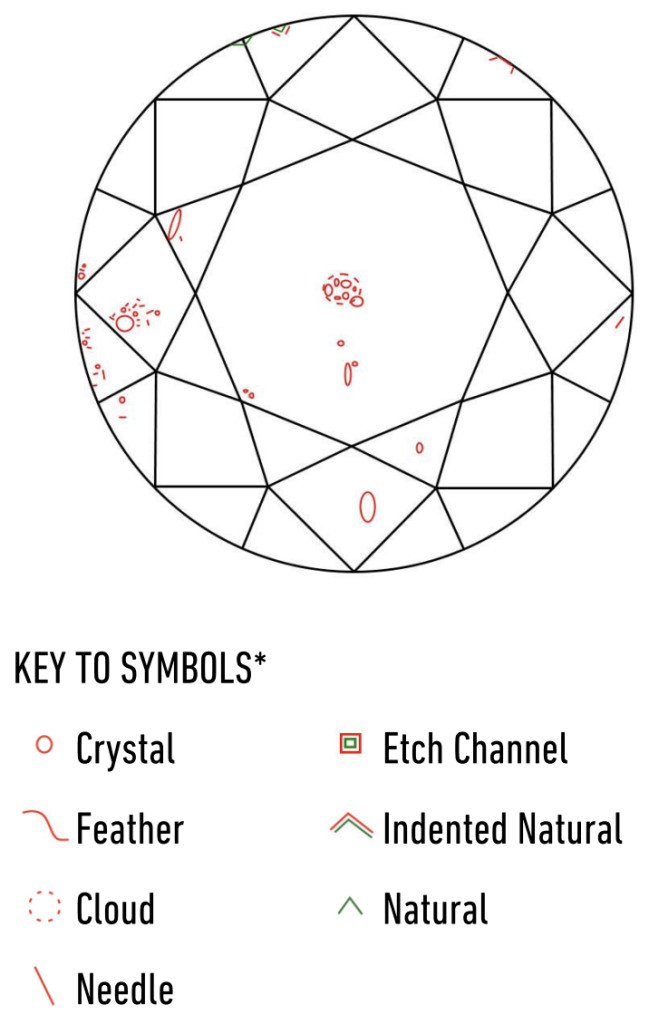
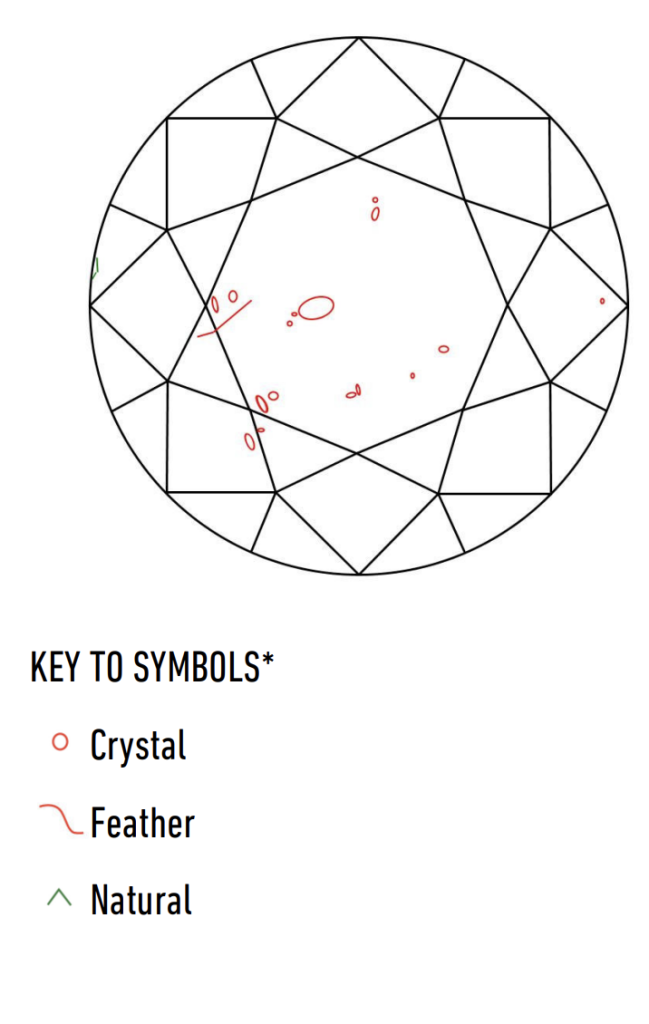
Both diamonds below — a 1.01ct D color SI2 diamond and a 1.30ct K color SI2 diamond — show a crystal inclusion under the table. And on the clarity plots, those inclusions look pretty similar. But let’s compare how they appear in real life…
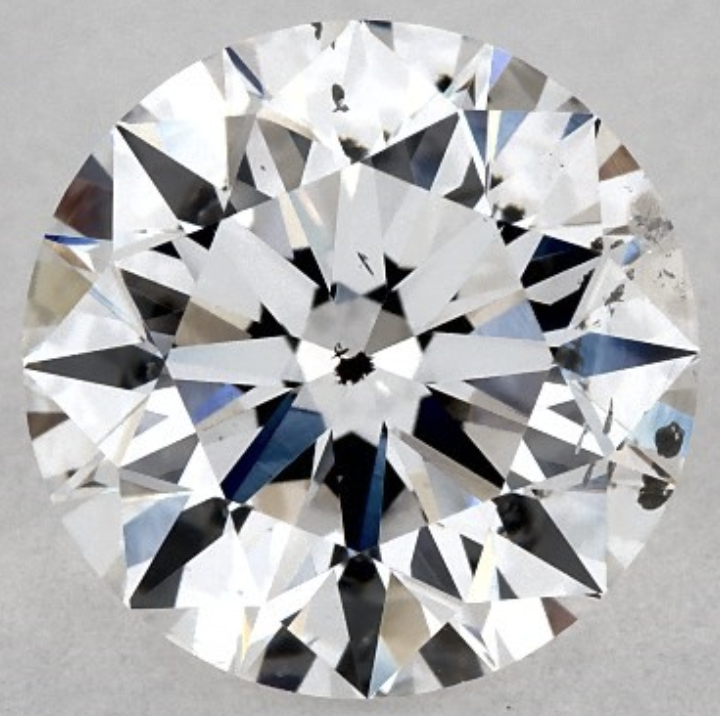
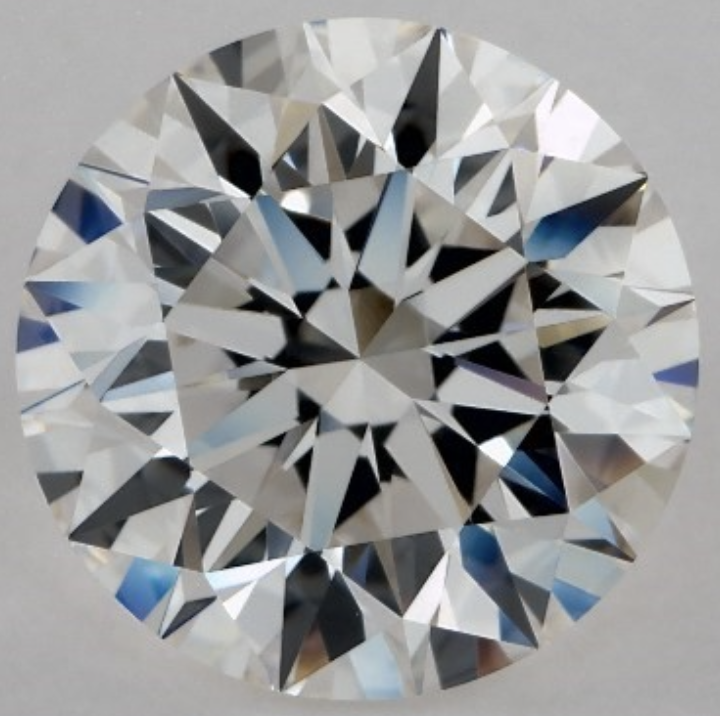
As you can see, the diamond on the left has a stark, black crystal inclusion. While the diamond on the right only has a white crystal inclusion which would be more difficult to detect in the real diamond.
The diamond on the left clearly isn’t eye clean due to the stark black inclusion. But the diamond on the right, despite having a crystal inclusion under the table, still appears completely eye clean. A great reminder that not all SI2s are created equal.
This side-by-side example shows just how misleading clarity plots can be without actual images. A black crystal inclusion will always be more visible than a white one, even if both are SI2. That’s why videos and high-res photos matter more than a paper report when clarity is borderline.
What About Inclusions in Lab-Grown Diamonds?
Lab-grown diamonds can have clarity inclusions too — and while they’re made in controlled environments, they’re not always inclusion-free. The inclusions often look different from natural ones and can include metallic particles, striations, or patterns specific to how the diamond was grown (HPHT or CVD).
Some of these are harmless, while others may create visible haziness or reduce brilliance.
Want to see how lab-grown inclusions compare?
👉 See the full guide on lab-created diamond clarity
Using 40x Magnification to Spot Inclusions
Gone are the days of relying solely on a GIA grading report to judge diamond clarity. Today’s best online retailers allow you to see the actual diamond with your own eyes often better than you could in a traditional store.
Thanks to 360-degree high-definition videos and imagery with up to 40x magnification, you can inspect every inclusion and surface feature up close before making a decision. This technology gives buyers the kind of confidence that grading reports alone can’t provide.
James Allen has the largest online diamond inventory and offers 40× magnified videos with lighting you can control. Blue Nile has the second-largest diamond inventory and some of the best prices on ring settings. Whiteflash specializes in ideal cut diamonds and includes advanced imaging like ASET and Idealscope — perfect for precision shoppers.
At this point in your diamond clarity journey, you already know how important it is to see the diamond for yourself. Not every VS2 diamond looks the same, and not every SI1 diamond is created equal. Eye cleanliness is everything. If a diamond looks flawless to the naked eye and the inclusions are minor (even if present) it can be a fantastic value.
Want to see how that looks in real life? Compare actual VS2 and SI1 diamonds in 40× magnification here.
That’s the key: You don’t need a flawless diamond. You just need a diamond that looks flawless when worn. With the right tools and a sharp eye, you’ll find clarity where it matters most: in the beauty you can actually see.
Conclusion: Perfect Doesn’t Mean Flawless
After exploring all the different types of inclusions, one thing becomes clear: a diamond doesn’t need to be flawless to be stunning.
The truth is, most diamonds have some internal features. But that doesn’t mean they’re all visible, distracting, or worth worrying about. The key is knowing which inclusions to avoid, which ones are harmless, and how to spot the difference.
Use grading reports to understand what’s on paper, but rely on high-quality images and videos to see what truly matters. A diamond that looks clean to the naked eye, performs brilliantly in all lighting, and fits your budget is as close to perfect as it gets.
So instead of chasing perfection on paper, focus on what the eye can actually see. That’s where the real value is and the real beauty.
| Diamond Inclusion Types – Full Comparison (All 14 Types) | ||||
| Inclusion Type | Occurrence | Description | Visibility Risk | Durability Concern |
|---|---|---|---|---|
| Crystal | Very Common | Small mineral or diamond crystals trapped inside the stone | Moderate to High | Low |
| Pinpoint | Very Common | Tiny white, gray, or black dots; often not plotted individually | Low | Low |
| Feather | Common | Minute internal fracture; may appear transparent or white | Low to Moderate | Moderate to High |
| Cloud | Common | Cluster of pinpoints that appear hazy under magnification | Moderate | Moderate |
| Needle | Moderately Common | Long, thin, white or translucent crystal inclusion | Low | Low |
| Twinning Wisp | Moderately Common | Twisted crystal growth pattern; mix of clouds, pinpoints, and feathers | Moderate | Moderate |
| Natural | Common | Part of the diamond’s original surface left unpolished along the girdle | Low | Low |
| Indented Natural | Less Common | A natural that dips slightly below the polished surface | Low to Moderate | Low |
| Knot | Uncommon | Crystal that reaches the surface, often visible and raised | High | Moderate to High |
| Chip | Less Common | Small surface break, often caused by accidental impact | High | Moderate to High |
| Cavity | Less Common | Hollow or indented opening; may trap dirt or oils | Moderate to High | Moderate |
| Bruise | Rare | Impact spot with small feathers around it; extends beneath surface | Moderate to High | Moderate |
| Laser Drill Hole | Rare | Microscopic tunnel created to remove dark inclusions | Low to Moderate | Low |
| Etch Channel | Rare | Natural worm-like tunnel or scar caused by extreme geological heat during formation | Moderate | Low to Moderate |
| ← Back to Quick Reference | ||||
